When we subnet a class A, B, or C address, we identify the change using custom subnet mask. Although we use the term custom subnet mask, in your career, you’ll just identify it as the subnet mask. A custom subnet mask is used by equipment and IT professionals to determine what the network range is for any given network.
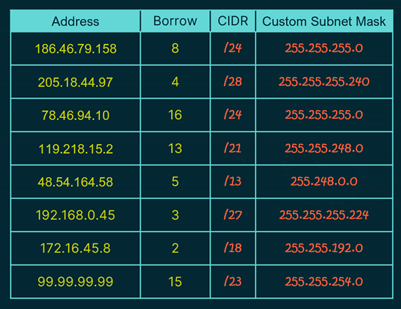
In this exercise, we’ll determine the CIDR notation and custom subnet mask for various addresses and the number of bits being borrowed. You can use the following process to determine the answers:
Identify if the address is a class A, B, or C
Determine if there are 8, 16, or 24 bits network bits for the default mask
Add the default network bits to the ‘Borrow’ bits listed in the table to determine the CIDR notation
Determine the ‘Custom Subnet Mask’ based off total number of network bits. You can use the borrowed bits to decimal table on the left as a reference to determine the ‘Custom Subnet Mask’
Check your answers with the answer key below. It’s recommended that before you proceed, you could perform this exercise without the use of the table. If you need additional practice, use the worksheet found at TechknowSurge.com. (link below).
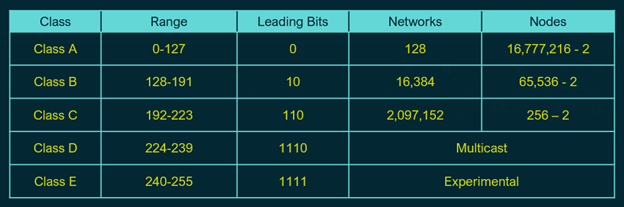
In our last module, we identified different classes of addresses. Here is the table for reference:
The address of 50.145.0.32, would be a class A address based off the first octet being 50. By default, class A networks use the first octet for the network bits. Since each octet has 8 bits, the first 8 bits would identify the network. In cider notation, this would be:
50.145.0.32/8
If the first 8 bits are all 1’s, the binary equivalent would be 255. Since the following bits are all host bits, the following three octets would all be set to 0. Our default subnet mask for a class A address is:
255.0.0.0
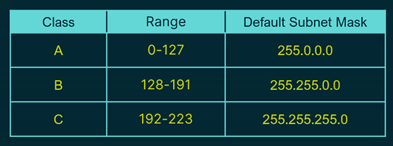
Since a class B devotes the 1st and 2nd octect, our default subnet mask would be 255.255.0.0. A class C devotes the 1st, 2nd, and 3rd octet making a class C address have a default subnet mask of 255.255.255.0. Here is a table for easy lookup:
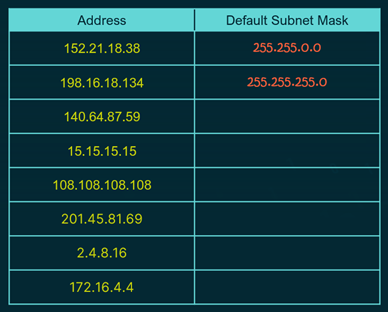
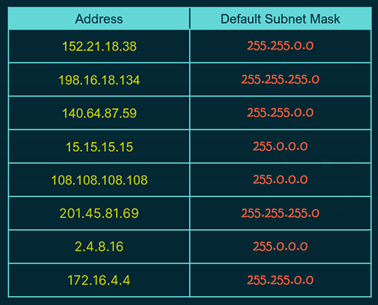
Progress Check: For each of the following addresses, determine the default subnet mask. Initially, you can use the first octet and class table to determine the default subnet mask.
Check your answers with the answer key below. It’s recommended that before you proceed, you could perform this exercise without the use of the table. If you need additional practice, use the worksheet found at TechknowSurge.com. (link below)
Computers or devices need to know where you drew that line. That’s where subnet masks come in. These masks are a series of ones and zeros that tell the device which part is the network, and which is the host. In the example below, the subnet mask is show in the red box, first in binary, then in decimal.
One thing to note, subnet masks weren’t necessary when we had IP address classes. You could determine the subnet without a mask. But when subnets came into play, we needed masks to specify where the line was drawn. If you stuck to classful boundaries, it became a default subnet mask.
CIDR Notation
CIDR was introduced much later than RFC 950 but will introduce it in this module to start becoming familiar with it. CIDR (Classless Inter-Domain Routing) notation, which simplifies subnetting. Instead of writing out subnet masks, you just count the number of ones in the mask. For example, a subnet mask of 255.240.0.0 is written as “/12” because it has 12 ones. It would look like this:
10.0.0.0/12
Default Subnet Masks
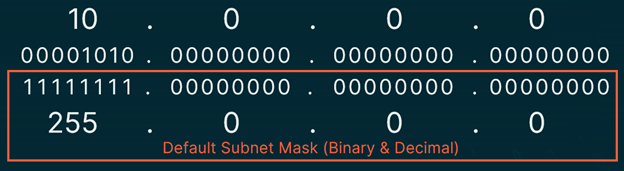
Defualt Subnet Masks just represent the classful subnet mask, aligning with the boundaries of the original IP address classes. For instance, if we spot a Class A address with a 10 in the first octet, it means the first octet represents the network bits, and the rest are for hosts. So, we set all network bits to one and all host bits to zero, resulting in a default subnet mask of 255.0.0.0 (shown in red box below).
This is what it would look like in CIDR Notation
10.0.0.0/8
Custom Subnet Masks
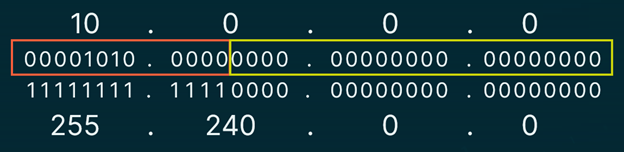
Custom subnet masks are subnet masks that fall outside the classful defined ranges. For instance, if we decide to borrow 4 bits, those bits become the network bits. The rest become host bits. In this example, the red box highlights the network portion and the yellow highlights the host portion.
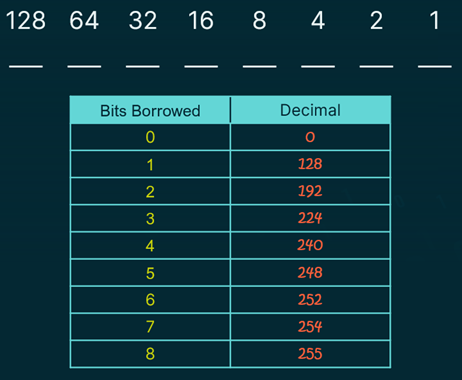
Custom subnet masks can seem a bit odd, increasing in the following sequence: 0, 128, 192, 224, 240, 248, 252, 254, 255. This is because we are barrowing bits starting from the left most binary number available to the right.
If we borrow one bit, we activate the 128 switch, giving us a decimal value of 128. Borrowing two bits activates both the 128 and 64 switches, summing up to 192. Adding one more bit flips the 32 switch, resulting in 224. And so on, until we reach 255, which is when all switches are turned on. This process occurs per octet.
First, we’ll take a quick trip down memory lane to revisit the history of IP addressing. We’ll touch on RFC 760 and how it initially defined IP addresses. Remember that back then, the first octet was reserved for the network, which only gave us a measly 256 networks. That wasn’t nearly enough.
Then came RFC 791 in 1981, which introduced classes—Class A, B, and C addresses. This improved things, but we were still limited to about 2 million networks. As the internet grew, we needed more networks and fewer addresses per network. This is where subnets enter the picture.
Subnetting and Borrowing Bits
Subnetting allows us to divide a network into smaller parts. Think of it as drawing a line in the sand within a Class A, B, or C address range. This line separates the network part from the host part. The trick is “borrowing” bits from the host part to create more networks. You can borrow one bit for two networks or eight bits for 256 networks. The location of that line is depending on what requirements your working with. The more bits you borrow, the more networks you’ll have, but also you will have less usable ip address for endpoints.
The example below shows a 10.0.0.0 network. The digital equivalent is displayed below it. We can tell by the first octet that this is a class A address. However, we can borrow 4 bits for the network bits. This is depicted by the yellow line
Drawing the line in the new location gives us 4 bits devoted to different networks. For every bit we add, we get twice the number of networks. To calculate how many networks we have created, raise 2 to the power of the number of bits we borrowed. In this case, we borrowed 4 bits. 2^4 power, which gives us 16 possibilities. We’ve just created 16 networks.
Note that the first 12 bits represent the network. However, we don’t include the first 8 bits when calculating how many networks we must work with. Typically, you will be assigned a network range that you are working with, or you are choosing from a private address range, a topic we’ll cover later. In this case, we have chosen the 10.0.0.0 network to work with, and are borrowing 4 more bits to create 16 networks out of that range.
In this module, we’ll break down subnetting and why it’s essential. To get started, let’s think back to our last lesson about IP addresses. We learned about different classes of IP addresses, each suited to specific network sizes. However, this system had limitations, allowing only about 2 million networks.
As technology grew, we needed a way to create more networks efficiently. That’s where subnetting comes in, and in 1985, RFC 950 laid the groundwork. In this module, we’ll focus on subnetting, starting with the basics.
We’ll explore subnet masks, which help us expand our networks. Then, we’ll uncover the “Anding” technique, which lets us identify network addresses accurately.
To ensure you master subnetting, we’ll provide practical demonstrations. By the end of this Module, you’ll be proficient in subnetting, ready to tackle networking challenges.